
In September we covered the science of tinting lenses in part 1 of this series. This month we will finish up with some detailed steps for tinting and applying UV coating, then close with some troubleshooting tips.
Proper Equipment & Set Up
- Tables - Tops should be made with white, gray or black laminates or from stainless steel. Laminates can be covered with “clear” glass to keep stations clean and stain free.
- Lighting - Use full spectrum light bulbs with a CRI (Color Rendering Index) of 92 or better. Use the same lighting in the tint and inspection areas (Duro-test Vita lite brand is recommended). These bulbs have a CRI rating of 96; sunlight has a rating of 100.
- Rinse water - Pre-rinse and post-rinse in 200 degree water.
- Tint units - 75% of your tinting is either gray or brown - it pays to have a quality, temperature controlled
 unit for these colors.
 - UV units - Keep UV in a separate unit capable of maintaining temperatures of 202 degrees. Preferably a heat and stir unit.
- Lens holder - Code your lens holders for light or dark colors and have separate holders for UV. Clean holders regularly.
- Standard dye tanks - (12, 9, 6 tank using heat transfer baths) Use these units for fashion colors and adjustment colors only. The temperature inaccuracy of these units will create fewer problems with light colors.
- Lens samples - Have minimum of 2 sets, 1 working set and 1 master set. Use 2.2mm planos and be sure to include lens materials (hi-index, poly, coatings) that tint differently, especially for the most common colors. Store the master set where it will not be exposed to light. Use the master set to update your working or customer samples.
- Adjustment colors - Include room in the station for master colors. Use fashion colors to produce tints, not adjust them.
- Thermometers - Use a high quality digital thermometer to monitor all temperatures.
- Timers - Use a digital, easy to use timer to track UV treatment and to find tint times with all coated materials to ensure they are not over-tinted. Have at least 2 timers.
Steps for Proper Tinting
-
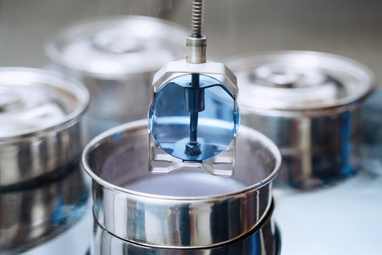
Ten minutes prior to dye: Stir the dye for 15 to 30 seconds if a self stirring unit is not being used.
-
Check dye temperature with a digital thermometer (in the dye itself). Maintain a consistent 200° - 202° temperature.
-
Identify the lens material & coating - do not attempt to process a lens with non- tintable lens coating
 on both sides.
 -
Clean the lenses thoroughly using alcohol (not rubbing alcohol) to remove the progressive markings, grease, oils, fingerprints, etc., then with soapy hot water until squeaky clean (use a dish detergent like “Joy”).
-
Place the lenses into the holder - make sure that the holder is not exerting too much pressure on the lenses.
-
Pre-rinse - You can dip the lenses into a good lens prep or hot water (200°) for 15 to 30 seconds prior to tinting.
-
Note: If you will be adding a dip scratch coat or UV, complete the steps above before tinting.
-
Place lenses into dye slowly - this will help prevent dye from foaming over.
-
Special Note: Coated lenses, hi-Index and polycarbonate materials should never be left in dyes at temperatures exceeding 205° for longer than 10 minutes at a time. If lenses are not dark enough after 10 minutes remove them from dye, rinse in hot water and allow them to come to room temperature. Repeat process as many times as necessary to obtain desired density.
-
Remove lenses and rise for 15 seconds in lens prep, neutralizers and even a mixture of a few drops of Joy and water heated to 180° to 200° to eliminate dye residue and reduce the chance of blotching.
-
Check the color using tint samples.
-
Adjust if necessary.
Steps for Proper UV Treatment
-
Five minutes prior to use: Stir the UV for 15 to 30 seconds if a self stirring unit is not being used.
-
Check UV temperature with a digital thermometer (in the UV itself.) Maintain temperatures of 210° or higher. Make sure that all UV crystals are dissolved into solution before treating lenses.
-
Clean lenses thoroughly using alcohol (not rubbing alcohol) to remove the progressive markings, grease, oils, fingerprints, etc., then with soapy hot water until squeaky clean (use a dish detergent like “Joy”).
-
Place the lenses into the holder - make sure that holder is not exerting too much pressure on the lenses.
-
Pre-rinse hot (200°) water for 25 to 30 seconds.
-
Note: if you will be adding a dip scratch coat, do so before UV treating.
-
Place lenses into UV slowly - this will help prevent UV from foaming over.
-
Remove lenses and rinse - in hot (200°) water bath to remove excess UV solution.
-
Verify UV effectiveness with a calibrated UV meter.
-
Tint as normal (if the job calls for color).
TINT TROUBLESHOOTING GUIDE

PROBLEM: Gray or brown lenses that appear too red or purple
-
Temperature might be too low. Adjust unit to maintain precise 205° temperature
-
Dye might be old or contaminated. Change if possible, if not, adjust color
-
Dye might be designed for light colors. Use dye designed for dark colors
-
You might find that higher index materials or certain coatings tint differently, adjust
OTHER THINGS TO CHECK FOR:
Lighting in inspection area is not full spectrum, dye pots may have been contaminated with old dye. Coating and lens materials may cause hue variations, try a different dye color for optimum results on those commonly materials used.
PROBLEM: Gray lenses that appear too blue/brown lenses that have Gray Tones
-
Temperature might be too high. Adjust unit to maintain precise 205° temperature
-
Dye might be old or contaminated. Change if possible, if not, adjust color
-
You might find that higher index materials or certain coatings tint differently, adjust
-
Your tap water is heavily chlorinated. Use filtered or distilled water. Chlorine destroys the red spectrum of dye.
PROBLEM: Hi Index, polycarbonate or coated lenses yield undesirable hue
-
Coating has an affinity for one of the base colors of the dye. Adjust using available tint chart. High index materials and coatings have different chemical and physical characteristics than CR- 39 causing hue variations. If you have a high volume of a specific lens type then use a dye designed for that material or coating or one with a different hue that gives better results.
PROBLEM: Coating Craze, Peel or Pit
-
Over exposure to temperature: Defective coatings, monitor temperature and times.
-
Defective hard coatings: Check all your processes to determine if it is a manufacturing defect.
PROBLEM: Coated lenses come out splotchy, with streaks, light or dark spots
-
Unevenly or improperly cured coating: Neutralize lenses and try to tint again. In general, the tint process does not cause coating defects. Hard spots or coating will take tint slower and less deeply than softer areas.
-
Overexposure to temperature: Monitor temperatures and times. It helps to think of coatings as a film that is stretched over the lens’s curved surface. This film will have two problems (1) it will have a different rate of expansion than the lens. (2) the coating may have minor imperfections that will show up when tinting.
PROBLEM: Two lenses in the same job tint differently
-
Lenses are from different batches: Pick lenses as similar as possible by type or manufacturer. Lenses continually cure. Tint one lens to the desired density and leave the other dipped longer until it matches - adjust with masters or color chart if necessary.
-
Lenses are mixed (stock & surface): Pull both from stock or surface both lenses. Surfaced lenses have more open surface (more porous) causing them to absorb dye differently than stock lenses.
PROBLEM: Lenses that won’t tint or that take excessive times
-
Coating is non-tintable: Switch to lenses with tintable coating. You cannot tint non-tintable coatings. All you can do is damage them.
-
Dye Temperature is too low: Adjust unit to maintain precise 205. There are several tint units available with accurate temperature control.
We hope that this 2 part guide will benefit you and make tinting lenses easier. Please keep in mind that no tint will give your patients the protection and satisfaction that polarized lenses do. Give your patients the best while not having to spend time tinting lenses.
